Thursday, August 30, 2012

Daemons: Flamers of Tzeentch comparison

Now that Flamers have found a new place on the battlefield, and shiny new models I thought I'd set them up side by side and look a good look at them. I'll say this, I'm not as big a fan of the new plastics as I was at the beginning, but they still have potential in my mind.

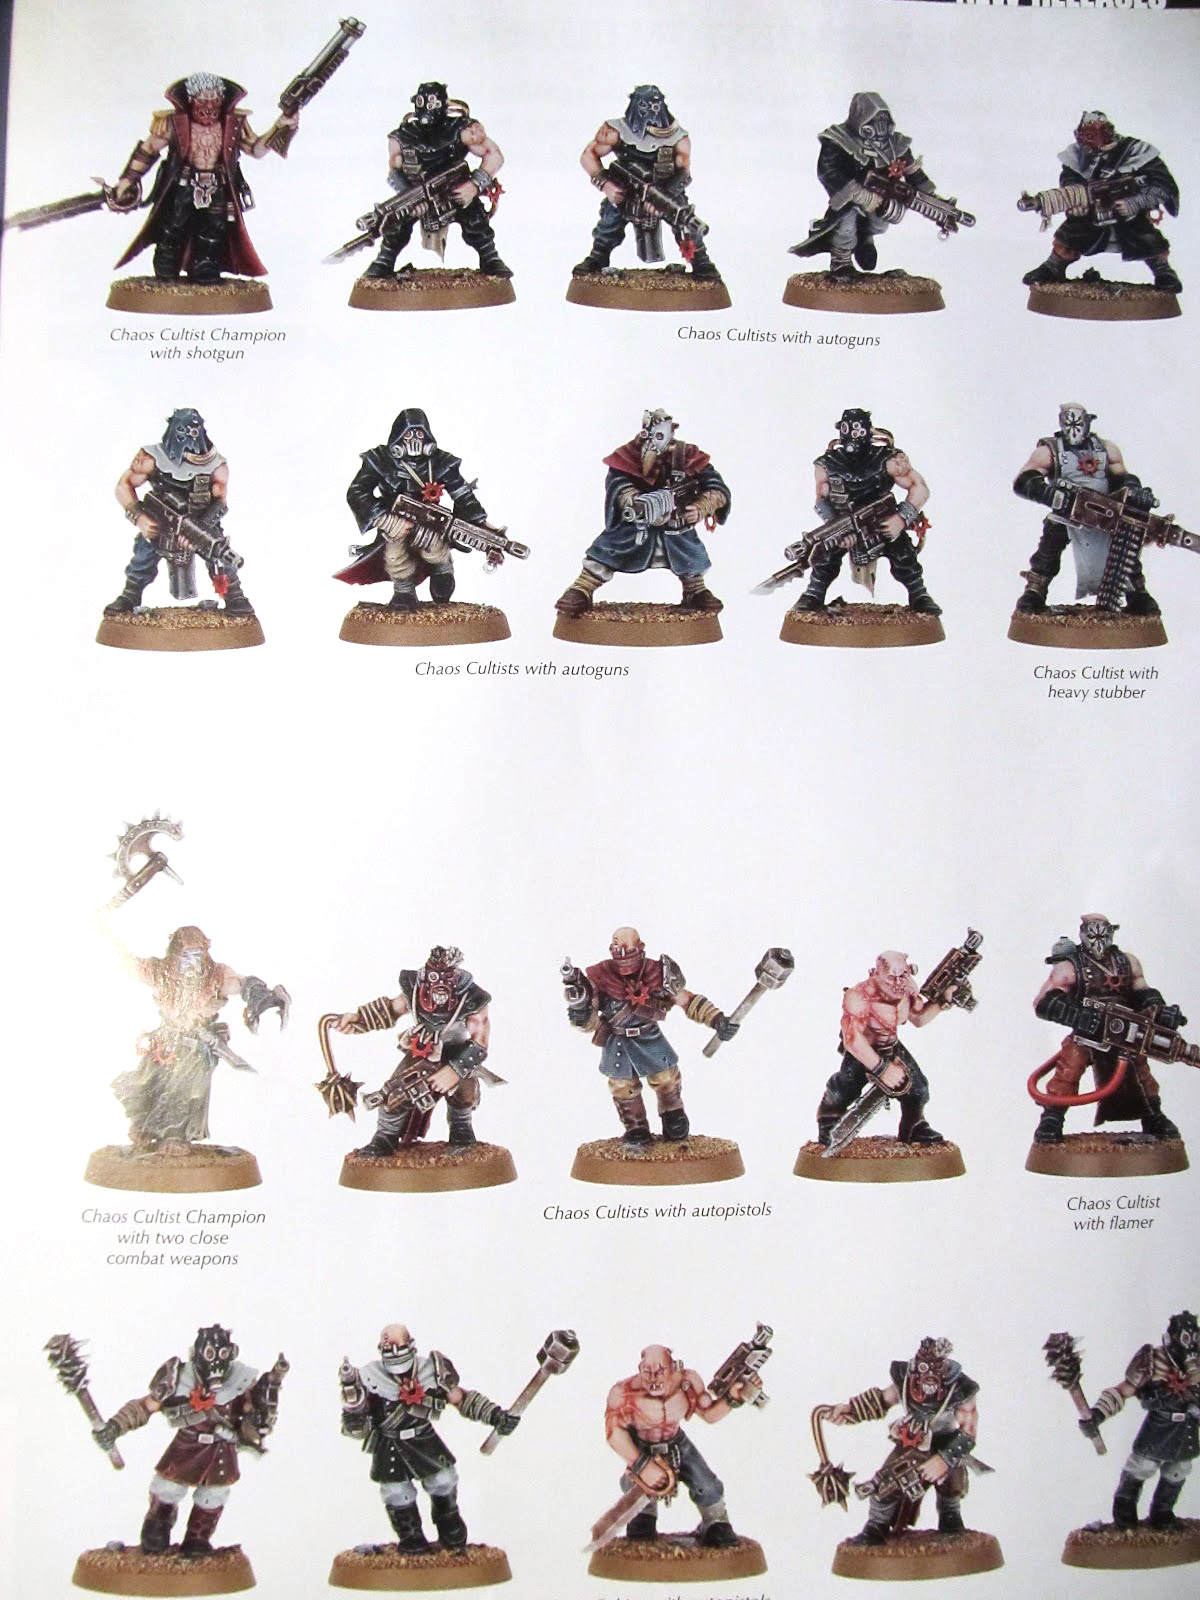
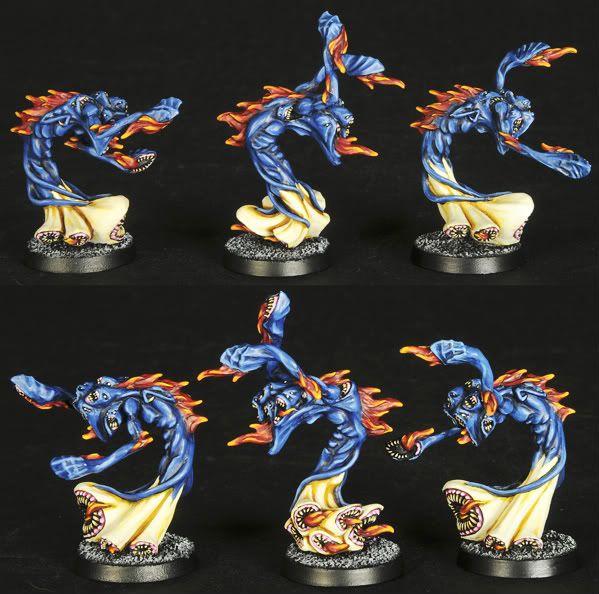
From the get-go, the build is completely different. The metal flamer is three bits: Body and two arms. The new plastic is six bits. There's two halves of the body, two halves of the head, and again, two arms. The plastic is easier to clean & work with, but take a lot more effort to clean up those seams. There are five heads for three bodies, so there are some options there, but it just strikes me as a lot more work.

Despite being based around the same general shape & concept the two are so very different:
 
Just by comparing the silhouette, you see the metal is more slender, more compact, and a bit taller while the plastic is stockier & more spread out. It makes me curious how well they'd rank up for Fantasy. The individuals heads are more distinct on the plastic, but all three bodies have a triple-head look to them which takes away a bit from the individualistic feel of the metallic minis. Also, for me the plastics forfeit a bit of their organic feel to the casting process.

The stockyness of the minis doesn't quite fit for the Flamer. They're bouncing gibbering pillars of mouths & flame, not muscular powerhouses. Their abs used to be like Brad Pitt, but now they're more like Terry Crews.One bit I do rather like is that several of the middle heads look a lot like Angler Fish, just gaping alien maws.

The jury is still out for me when it comes to the actual flames and teeth. They're far more aggressive looking on the plastics, while the metallics look like they're being pushed back by the wind. On the plastics the flames all sit to one side of the mouth or the other thanks to how the mini is put together. I'd like to see them look like they're actually being spit from the center of the mouth, but again you can probably thank the casting.

Overall I feel like the Flamers got a bit of the Pink Horror treatment. The metals have a better feel to them, and are more characterful, but the plastics will still hold their own. I'll probably grab up a few more metals to fill out my army, but I'm not going out of the way to snatch them up in lieu of the plastics.

Also, it wouldn't be a Tzeentch mini without a little conversion, so I modified one a bit to serve as my Pyroclast. The box comes with 8 arms for 3 minis, so it would be a great disservice not to stick them all onto a superior Flamer.
He's tall, nasty & should look great leading the rest of my Flamer unit. Although the differentiate him even more I think I'll give him a Deep Red upper body, & green flames. We'll see how it pans out.

~Muninn

Monday, August 27, 2012

Test Mini: Deathwing Bone

With Dark Vengeance looming large I thought I'd start working on how I'd go about painting the Dark Angels, since I'd like to sell them off quickly.  My first test mini is for use on the Deathwing Terminators. They've got an iconic bone look that can be tough to look clean.

Fortunately I've already found a Bone Armor technique. I just wasn't sure how well it'd translate on a smaller scale.  Turns out, very well.
This is a throw-away marine I got for cheap on eBay. It had some ugly mold line work & thick primer when I got it (eBay has some risks), so I never really planned on using it for my actual armies.  Despite this, the technique worked perfectly. The paint went on smooth & without difficulty and looks really clean at the end.  This should be a really fast & efficient way of painting up the Deathwing termis once I get them.

~Muninn

In case you don't feel like clicking on the Bone Armor link here're the basic steps.

Steps:
1. base the model with Krylon Almond Indoor/Outdoor paint
2. wash with Gryphonne Sepia
3. drybrush a bit of white to find the high areas
4. paint thin coats of a light ivory color (I'm using P3 Menoth White Highlight)

Friday, August 24, 2012

New this Week

Since I tend to bounce from project to project I thought it'd be easier to just give recaps on my various works in progress. I don't write a lot of filler, your eyes don't glaze over, it's better for all of us.

First off: I built all of my plaguebearers. They looks great & they're in line for priming.
I also used the extra nurglings to make a base. I modified the one in the back to look like he's holding a little scythe by carving a scrap of sprue. If I end up making a unit of these guys I'll probably bits order more of the extras from the bearers box, & maybe the free-standing ones from the nurglings box. All told the bits would probably run about $4.00, so not much of an investment for a nice little tar-pit.
I only performed one minor conversion to these guys here:
This is my champion & ass you can see grandfather Nurgle has seen fit to grant him a slightly different weapon. This is actually the scythe from the plastic Cairn Wraith mini (I used the rest of the mini for a Tzeentch Herald conversion). It fit perfectly, & totally fits with nurgle's motif.

First on my painting table is the Greater Knarloc. Damn if this thing isn't big. He's detailed, delicate (not sure what glue was used on him, but it doesn't alway hold up) & hella daunting. Sometimes I just sit back at my painting table and try not to make eye contact with it since I don't know what to do next. He's getting paint though & I'm thinking about submitting it for the painting competition next month if it turns out well.

Finally, the main reason I want to get the Knarloc off my table is to make room for the Dark Vengeance starter set. I'm making plans in my head, figuring out colors, & schemes, & how I'll afford it. My plan at the moment is to paint up the Dark Angels is a fast-but-stylish way and sell them in order to mitigate the price of the whole box. You can expect to see a few test minis to this end in the next week or so.

My major concern in ther sale is method & timing. I figure the easiest way of selling them would be eBay, although it comes with its own risks. I figure I'd start bidding at $30 & hope for the best. Likewise I'm not sure if I'd want to paint quickly & try to ride the wave of folks who want to get their hands on the new starter, or hold off and sell once te Dark Angels codex drops. Either way it's probably a crap shoot.

~Muninn

Sunday, August 19, 2012

Yorrik: Psyker & Sisters of Battle

My buddy Yorrik continues to grind along with his project & this week he's added two more. The first, this Bane-looking lady, is his Primaris Psyker.


"Mordeheim Augur body with some conversions in the head and hands area. The idea here is that this little lady is a Throwback, an abhuman who appears "normal" enough to act as a liason between the tunnel crawlers and the surface dwellers. So she's sort of two-times a mutant. Oh wait, she's also a witch, so that makes her three-times a mutant. Anyway, she is a fun, welcome addition to the army."

Secondly, upon warming to the potential of the new Allies rules he's set out to build a small contingent of Sisters of Battle. In his army fluff a virus/plague/whatever decimated the population though so they didn't come out of it unscathed:

 "My thought here is that the planet Asclepius has a moon, and that moon had a chapel-barracks for the Order of the Bloody Rose. Now, the sisters were infected just like the planetary population, but the most faithful Sisters survived the worst of it, and now fight on in a state of painful living death. For the Emperor, of course."

~Muninn

Saturday, August 18, 2012

Test Mini: Leopard "Shark"

Before I jump into a project I like do a test mini. Instead of committing a whole squad or army to a new paint or technique I'll dig through my bits box & use it on a throw away mini first. At very least it helps me get a feel for how well the technique works, and I usually get a decently painted mini out of it.

Thursday I wanted to get to work on the Greater Knarloc, so I figured I'd give the color scheme a whirl. Since I was testing a leopard-like print, what better than to paint up a leopard?

What you see above is my basic plan. The majority of the fur is a mix of Graveyard Earth, Codex Grey, & Chaos Black then white added for subsequent layers. The color of the undercoat is Kommando Khaki with white. The spots are Chaos Black & Scorched Brown. Then everything got a wash of Devlin Mud & Badab Black.

I learned a few things from the mini. 1.) I need to lighten the base colors a bit to make sure the "spots" stand out better. 2.) less Devlin Mud, it seemed to add too much of a brown cast to the mini, particularly the lighter coat. I'll probably use Devlin Mud right after the base coat to add some depth, but not afterward.

~Muninn

Friday, August 17, 2012

Dark Vengeance: Better shots!

Here are more shots I picked up from Faeit 212, and they look stellar. I'm really excited for all these minis. Particularly those Chosen. Drool.

~Muninn


Dark Vengeance leaked pics


Faeit 212 posted these shots of the leaked Dark Vengeance minis earlier today (the pics were originally posted on 4Chan). They're small, but show enough detail to make me excited about the prospect of buying this box.

Honestly, my plan up to this point was to paint both sides, and sell the Dark Angels to help pay for the rest. Now I'm not so sure that I'd want to get rid of any of them. I really like everything I've seen, so I guess I'll have to make my decision once I have it all done.


Tuesday, August 14, 2012

Commission: Greater Knarloc

   So it isn't technically a commission, since I'm not getting paid, but I made a deal with my LGS owner that I'd paint one of his minis in exchange for helping out with a buddy's birthday present. In the end he pitched in $90 for the present, and asked me to paint up his much beloved Greater Knarloc. It had been half-painted & gathering dust for years now, so I guess he figured this would be a good way to get it done.

He collects Kroot like they're going out of style, and is probably the only guy I know that plays an all-Kroot army. He paints them in all types of kooky colors, patterns, & loves to convert them too. He even converted a Kroot Vindicare assassin.

Here's what it looks like to start with:


This thing is his baby, so he has a particular vision in mind for it.  Namely, he wants the skin to look like a Leopard Shark. I've never painted that kind of pattern before so it should be interesting. The shots I've seen of Leopard Sharks are kinda varied, but I plan on using a darker grey-brown base, then darker brown spots, mostly based on his photo:
This'll really test my skills, so I look forward to painting it, & sharing my progress.

~Muninn

Monday, August 13, 2012

Plaguebearers: Assembly

After having dealt with every major plastic troop choice in the Daemon army, I have to say that the Plaguebearers are by far the easiest to work with.  There aren't many insufferable spiky bits (bloodletters), no delicate hair (daemonettes), and no jewelry to carefully carve around (horrors).


The mold lines are in logical & unobtrusive places, and the spots where the mini contacts the sprue are easy to clean (the only minor exception to this is that on several chest pieces there are connections on the "side boob" that requires a little more finesse). Plus, since the bearers themselves are rather round I could easily use my file in most instances. 

Here's the basic Plaguebearer. Not very pretty, but pretty damn cool.

As expected, there's an unattractive seam where the chest piece connects to the body, but there's an easy fix for that.

You start with a small amount of recently mixed greenstuff. I mean small. Like maybe half the size of a krak grenade.
Here are the simple steps.

1. First you roll it into a thin string, divide it up, and place it on the largest of the two bits, where you want to fix the seam. The goal is to place greenstuff on the mini where the two pieces connect, so the epoxy will squeeze out.

Here you see that I've placed my greenstuff on the sides of the chest, and at the base of the stomach since that's where the seam is most noticeable.

2. Then you push the two together. Start by applying glue to the second bit. I usually place the glue in places where I don't already have greenstuff, so here I put glue around the collarbone and hips.

When you push the minis together the greenstuff will squeeze out from the seam, and the glue will keep the pieces together.

3. Take your finger and smooth the greenstuff evenly over the area. I've found it works best to lick my thumb and press down a bit, then spread it around with little circular motions. This is the reason i don't want glue where the greenstuff is, since you could end up gluing yourself to the mini while smoothing it with your finger.

This technique is a wonder when it comes to non-armored minis that are meant to look organic. A seam can really break up the look of a mini, so this helps give it a more natural look.

~Muninn

Friday, August 10, 2012

Painting Competitions

In the last year or so my LFGS has really stepped up encouraging local mini painters to show their stuff.  They've put on four Painting Competitions so far, and more talent shows up each time. I live in a smallish college town in Oregon, so there probably isn't as deep a hobby following as in other places, but we do alright.

To date, I've entered minis in three competitions & placed well in each. I didn't enter anything in the last competition because I helped judge it. To prevent the same people from winning over & over again the owner established the rule that after your 3rd prize, you have to take a turn as a judge.

It seems fair to me since 1) It spreads around the winnings, which encourages more participation, and 2) the best painters should be the best judges of other minis, since they would be able to recognize skill & degree of difficulty in a mini.

Here are the three minis I've turned in for competitions so far:
Ikit Claw: 1st place

This was for the store's first competition & I went all out.  To kick off the Storm of Magic campaign the owner decided to have a WH Fantasy Painting competition. I'd been in a position to enter a mini for judging, so I wanted to show up with something truly impressive. I picked up an Ikit Claw, a new blister of green stuff, & some bits & bobs for a diorama.

As it turns out I was the only person to put that much effort into the mini & base, so I won handily. I ended up taking a Balewind Vortex as my prize (I could've gotten the SoM book or Magewrath Throne), which means I spent about $40 to win a $15 mini.

Daemon Prince: 2nd place

I dialed it back a little for this one. My plan from the start was to use this guy for my Daemon army, so I decided not to make the base too scenic or dynamic to keep from taking attention away from the rest of my army (plus LoS issues). It had a good showing, but the other painters had taken a note from my Ikit Claw mini and stepped up their minis & bases as well. 1st place was an excellent bone-colored Sanguinor with crimson rising above a sea of outstretched, zombie-like, hands.

Either way, I got a new codex out of the deal, so I was happy.

The Deceiver: 1st place

This one I've already covered on the blog, but I'm still a fan of it. The owner made me a deal that if I took on his Deceiver mini he'd waive the entry fee for the painting competition. There were some other really good minis, but I managed to take 1st.  So i got a $90 box of Ogres for the cost of some sand, glue, primer, green stuff & paint. Damn good deal if you ask me.

There will be another painting competition coming up in the next month or so, so once it's announced I'll let you know what I'm doing. :D

~Muninn

Monday, August 6, 2012

Plaguebearers: Box Breakdown

So after a long weekend of work i was finally able to get to my LFGS to buy the long-awaited Plaguebearers. I haven't been able to find a good summary of the sprues anywhere, so I thought I'd write one up.

First things first, this box is jam-packed. These are pretty sizable minis, but they've still managed to toss in plenty of extra goodies.

Each basic mini is broken down into five bits: a Body (torso & legs, but no chestpiece), a Chestpiece (chest & stomach), two arms (right arm has a sword, left arm is generally free), and a head. I'm quite fond of the heads. There's a fun variety of faces & expressions, like one that looks like it's spitting maggots, or another that looks like a fly's head.


The limiting bits are the bodies & chests. There are a total of 10 of each, so if you're going to build a whole unit you don't have any extra options there. They're great though, so I'm not complaining (I'm particularly fond of the bodies that look like the legs have elephantitis). There are a few funny bits here as well, like the chest where a nurgling is peering out from the inside of the stomach.

There do appear to be matched pairs between chests & bodies too. Each bit has a letter etched into the back, (A, B, or C) so I'd wager these are meant to fit together. There can be a little variety here though, since there are several bodies/chests with each letter.

I'll be interested in seeing how well the chest & body fit together. The bloodletter box had some obnoxious seams in it, so I'm hoping this looks better.

Rounding out the rest of the bits are severed human heads (eyes & mouths are sewn shut, so the triangle it forms looks little like Nurgle's symbol), Nurglings, and little piles of maggots. There are also banners & a musical instrument (a pan flute) for the full command.

The nurglings are fun as well, kinda like mischievous pus-bubbles (three words I never thought I'd string together). I'll probably put them on a base for use as swarms instead of tossing them on my bearer's bases as decoration, although two appear to be swinging from entrails.

Here's the breakdown of bits:
10 Bodies
10 Chests
15 Heads
11 Right/Sword arms
13 Left arms (includes champion arm w/a bunch of heads, the banner pole arm, & the flute arm)
7 Nurglings
3 Human Heads
2 Banners
2 Maggot Piles
1 Flute

In conclusion: It's a great looking box. Good sized minis with numerous options & bits for later conversions. I'll probably end up building them this week, & put them near the front of my painting queue. :)

~Muninn


Friday, August 3, 2012

Yorrik: Abhuman Commander

One of my good friends, Yorrik, also happens to be an avid mini painter & modeler. In addition to my usual painting projects I'll occasionally be featuring his work on this blog as well. The above mini is his most recent success, an Imperial Guard Commander converted from an SoB Missionary, an Enforcers Cyber-mastif, & some other bits & bobs. Not sure where he got the hat from.

For several years now he's been slogging away at a unique, highly converted Abhuman Imperial Guard army. Here's the story he put forth:

"The idea is that there is a planet where normal, healthy humans live on the (relatively) livable surface, while a race of degenerate, hunchbacked abhumans toils away in the tunnels and mines below. The attack of an enemy force (maybe Chaos, maybe Necrons, could be anything really) has wiped out the humans that lived above ground. A single Guard Officer (perhaps a Commissar) survives the attack, and escapes into the tunnels, where he whips the abhuman slaves into a ragtag fighting force."

Here's what he wrote about the mini:
"The idea here is that the Commissar is the only non-mutant to survive the weaponized disease that ravaged the planet. The fiction is working out so that a Nurgle-aligned Chaos warband is responsible - maybe the Purge. Anyway, the Commissar here whipped the underclass of mutants into a force of guerrillas that are trying to take the planet back. His cap is the only bit of his uniform he has left (the coat got shot full of holes) but he's been able to scavenge some key relics from the surface (including a rosarius/refractor field, and several other icons of the ecclesiarchy). My favorite bit is the Cyber Mastiff, which I figure he came across when looting an Adeptus Arbites Courthouse. It's going to count as a powerfist."


It's easily one of my favorites I've seen from him, and there will be more to come.

~Muninn